Welcome


Welcome Scraps, Graphics and Comments
More Images & Orkut Scraps

Friday, July 18, 2014

Halloween In July Finally !!!

 How about these cute Halloween Pumpkin decorations ! We have done all the hard and messy work for you, they are cleaned, designed and carved All for you ! Then we hand painted them in many different styles, and they Light Up ! Yes we have made them the perfect Halloween decoration that will Last for years to come ! They come with an electric clip  in light . We seem to every year  for some reason fall .. ha  ha  behind when it comes to putting our Holiday items out in our Etsy Shop - www.etsy.com/shop/inmypaintedgarden  late every year. ! So this year we decided to get a jump on the season and start doing our pumpkins.. So we are building stock for our Etsy Shop , the Bell Buckle/Maple St Craft Show in October and for Shabby Lane Shop in Nolensville.

  These are just a few of the styles of lighted Halloween Gourds we have  sweet, scary or friendly we are designing them !

 We also do a few other Halloween items like this antique insulator that has been painted up like a cat hiding in a pumpkin and it also is a table decoration ! 
 This is one of our Gourd Pumpkin Houses  They also light up !!


 This ghostly pumpkin that we call  " Gold Tooth " yes he has white teeth also. He is a little bit smaller than the other ones pictured but he sure is cute ! We have been painting them in colors of burnt orange, tangelo and a pumpkin orange . The burnt orange is the darker orange, the tangelo is a brighter color orange and pumpkin orange well it's just a pumpkin orange ! We paint orange teeth, white teeth and even gold teeth !


      So basically we have all kinds of pumpkins that we are stocking up on and if there are any of them that you would like to buy or order or even have specially ( custom ) made then either you can go to our Etsy Shop www.etsy.com/shop/inmypaintedgarden  or order them from right here off the blog or Shabby Lane Shop in Nolensville TN , Or of course we will be at the Bell Buckle/Maple Street Arts & Craft Show .
      These Lighted Pumpkins would be Great for Grandparents or anybody who still Love to decorate but don't like the mess ! Just buy it once and it's your for years to come !

 We even add a Care Card for your New Halloween Decoration !!

Would Love if you would leave me a comment or suggestion !

                                                     Until Next Time !


Monday, July 14, 2014

PLEASE HELP !! It's An Antique !!

 I'm putting this out there in hopes that somebody might be able to help me get my husbands   1957 Ford Panel Van Restored. We have owned it for over 25 years and at one point when he first got it he  started to restore it ( we even drove it to MIS Michigan International Speedway ! ) but then he  lost his job in Michigan so that put an end to it we had hoped only for a minute but a minute has turned into 15 more years  and Still No Money to fix it !! He has thought about selling it but I don't want him to !! He works to hard sometimes 6, 7 days a week 10, 12 hour days and sometimes when it's raining sent home ,  has already given up a lot of his Dreams,!! I am unable to work as I have RA under doctors care and have not been able to receive social security yet and life is tough and a struggle every day . Together we raised 8 boys a blended family  of  his, her's and ours ( don't know if you can guess what that was like )  but if there is anyway possible for me to make this come True for him and it be a Surprise it would mean the world to him and me !!
This is what the inside of the front seats look like !
 

  We moved from Michigan to Tennessee for a couple of reasons one being a job. We ended up having to leave the Panel Van back in Michigan because we had no way of bringing it to Tennessee. About 4 years later one of our boys Zach surprised us by hauling it down on a flatbed trailer because he knew how bad my dad wanted to do something with it .


  Yes we thought...... well here it sit's still in the back yard! My husband still has not been able to do anything with it and a couple of times we have come close to having to sell it again !

  It has a Chevy 350 engine in it  and we have not driven it since .


 It has become a bit of a storage unit which is just heart breaking !

 This is what the 1957 Ford Panel Van looks like , it was painted at one point and time ....
 
Please if anybody knows of somebody that would be willing to restore it for my husband and help me out  my boys have suggested some of the television shows where they help  restore old vehicles for people who can't  afford to do it .. PLEASE Help me make his Dream come true ..

                                                    Thank You So Much ,


Tuesday, July 8, 2014

HA HA HA My Gourd Garden This Year !!

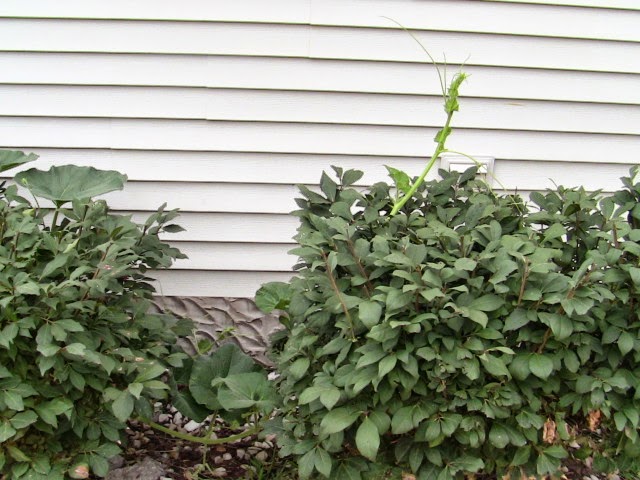
  This is just a quick update but I wasn't able to plant my gourd garden or any other garden this year but a lot of times I clean my gourds outside , Well usually I sit outside with a garbage pail  and scrape my gourds out and sometimes I guess I miss the basket and they hit the ground ! This first picture was taken about q week ago it is in a stone covered spot with three bushes outside my kitchen window , the seeds took root ....
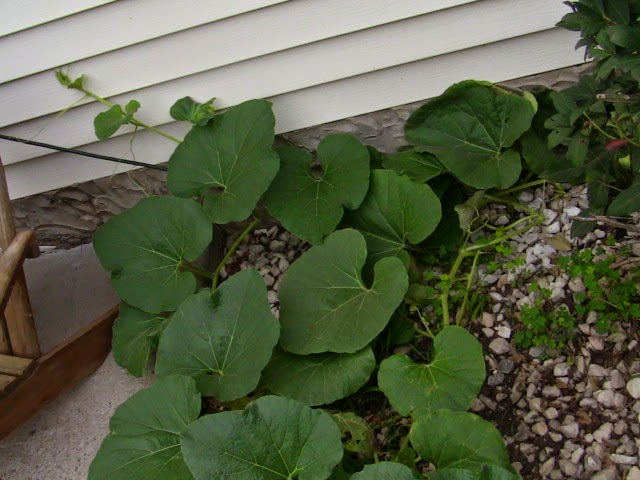
This was taken today 7-8-14

  These pictures were all taken today July 8.2014 and they are all traveling along the bushes and heading for the fence at one end and the back door to my house at the other end.

 My son said he has been watering it every time he comes outside! But you know sometimes I have had a hard time in spots that I have decided  to plant them at before like along the back fence a couple of years ago it was just to wet .but  last year and the year before was a Fantastic year for my gourd garden!  So even though we didn't get a chance to plant one I guess God and Mother Nature and some watering from my son and now we are all taking care of it I have a tiny gourd garden !.

 Look the plants are starting to produce some baby gourds oh my ! Now I can't wait to see what kind ( I think Martin ) and if they will even mature but I really don't think so,


Well wish us Luck !  Thanks for stopping and taking a look !

                                                Until The Next Time,

                                                  
                                                                               &

Sunday, June 22, 2014

Fancy Beaded Watch Tutorial

 I started making these beaded watches a couple of years ago, they are fun to make but a little time consuming but when you are finished with the first one and it has turned out the way you wanted  happy ! happy ! happy  I know that there are probably other beaded watches around the web but I thought I would post the way that I make mine.so maybe you can make your own. Mine have been with a lot of trial and error like getting the right size elastic cord that fit into the holes on the watch and finding easier ways for threading and beading that would be efficient but yet quick and for me this was my way.
Since learning how to make them I have sold quite a few of them, lots of compliments and men like and wear them also !
These are a few of them that I have done

So here's what you will need :

watch face for beading
seed beads
1 mm elastic beading cord
safety pins size - 1
flexible beading needles
pliers


 These are what I use and I also bought a bunch of plastic containers to put all my assortment of seed beads, assorted safety pins and finished pins that I have done .


This is what your pins will look like once you have the beads on them. After you have the beads on  the safety pins then I take a pair of small pliers and pinch the end so it doesn't come open, 


Then after I have a lot of pins beaded and the ends pinched on the  I string the elastic through the hole on the  watch face.( I use about two and a half three feet of elastic you won't use it all but it's better to be safe then sorry so you don't come up short when your done and have to restring the whole thing again )  When you string the string in the holes you go in one hole then the other hole, make sure the elastic strings are even on both sides  after you pull them through.


 When you put the beaded pins on the string you put the pins on just the opposite of each other ( like in the picture )

You keep on stringing the beaded pins on until you have the size you want . Remember you need to have it  stretch a little bit so when you put it on your wrist it will fit nicely.  After you make your first one the next few will get easier and easier.
This is how the front of the strung watch band should look

This is how the back of the watch band should look

This is how the watch will look when you have it ready to tie off to finish it .


  You tie off the back of the watch face just like you did in the first step.  Basically fit it to your wrist  then you insert your elastic string through the holes on the watch face  and then tie them off with a couple of knots and as you can see in the picture above the strings are tied off and hidden. I have put approximately 78 beaded pins on this one but it all depends on the size you need to make.


Yes you are done ! I sure hope that this tutorial might inspire you to make your own !  I have made all sorts of them with designs made from mixing up the beads ,you can  make two tone ones . Just have fun with them !
 
Until The Next Time,